Lucas’ Retro Cardboard Play Camper
Do you have a happy camper in need of their own retro cardboard play camper? For Lucas’ ONE happy camper themed first birthday, I took on this adorable HGTV cardboard play camper tutorial. HUGE SIGH OF RELIEF FOR BEING DONE! I am soo excited to share the result! I definitely have some lessons learned and modifications that I’m sharing today.
How To Make YOUR VERY OWN Retro Cardboard Play Camper
Project Details
Project Cost:
- Cardboard box = $6.95
- 3 Cans of Spray Paint = $14
- 6 Sheets of Cardstock= $2
- Plastic Drop cloth = $3.28
- Folding Table: $40
- We already had the other supplies around the house
- Total Cost: $26.23 + $40 for the folding table
Time to Complete:
Plan to be working on this project across 2 to 3 days.
Materials You Need
- Cardboard: To make Lucas’ camper, I struggled to find a large enough piece of cardboard and finally stumbled across this large mirror/picture frame box from Uhaul.
- Folding Table for Base and a Bed Sheet: I knew that toddlers would be playing with this camper so I needed a sturdier base than what was suggested in the HGTV tutorial. I was already searching for a craft table so I used this 34″ x 34″ folding table from Target for the base.
- Red, Brown, Green, Black, Grey and White Cardstock or you can use fake flowers in place of the green and some of the red cardstock
- Satin Bright White Krylon Fusion Spray paint
- Matte Vintage Blue Krylon Fusion Spray Paint
- Satin Burgundy Krylon Fusion Spray Paint
- Box Cutter with Extra Blades
- Plastic Dropcloth or Spare Board
- Hot Glue Gun & Glue
- Scissors or Cricut for Cutting Flowers
- Contractor’s Square (optional but totally worth it)
- Twine or Ribbon
Draw and Cut
Use the below measurements to draw and then cut your picture frame box so that it will conceal your folding table. The folding table I used is 28″ tall x 34″ wide. Use a contractor’s square to make your lil’ camper level and square.

I cut a separate door and glued it onto my smaller door cut out so that the red door could be painted separately and I could fix my horribly jagged initial cuts. If you’re planning to do this, cut your camper door smaller than the separate red door you plan to glue to it.

TIP: If your box cutter is shredding more than actually cutting, change out your blade!
This was mine, prior to realizing that I could just replace my blade to fix the shredding. Soo much cardboard.
Instead of cutting my flowers, window box and tire out of cardboard, I used card stock because it’s cheaper than buying a whole can of paint and I wanted to use my cricut for cutting these smaller cuts. You can find the link to the published Cricut Design Space project here.

TIP: After playing with the camper, I wished I had just bought fake flowers or made the flowers out of felt because Lucas loved them and wanted to carry them around so take that into consideration before cutting the flowers.
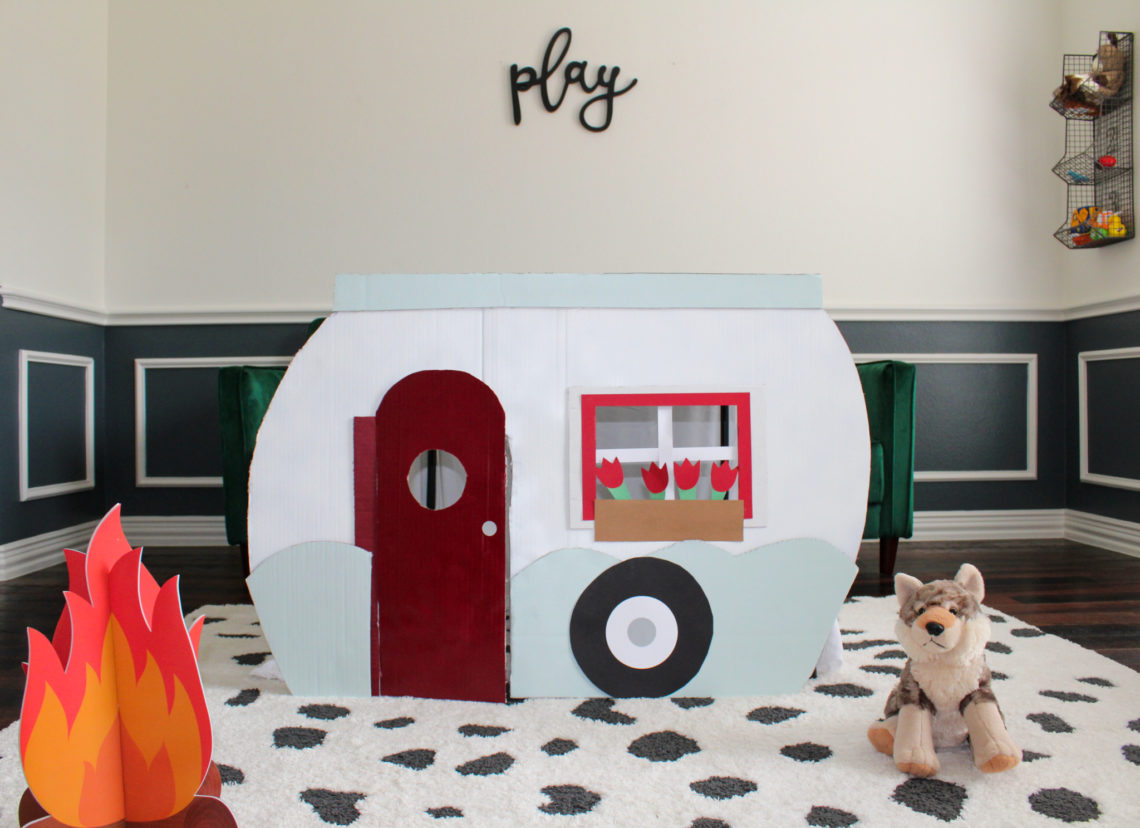
If you’re cutting your add-on pieces by hand, your red window frame should have a cut-out of 9.5″ x 7″. Your tire circle cuts should be about 10″ for black, 5″ for white and 2″ for grey.
Paint Your Cutouts

Once you have all of your pieces cut, it’s time to paint. It’s been so dreary and rainy here in Texas so this is the part that took the longest for me. At one point, I was literally chasing a flying piece of painted cardboard across my yard thanks to the wind. #momlife Anyways, plan to spray your cardboard pieces with at least two coats & maybe weigh them down if it’s windy.
TIP: Save on using your white spray paint on the door and the bottom of the camper. They will be covered anyways.

Glue, Glue, and Glue Some More
Once your cardboard pieces are dry, you’re ready to hot glue. This step is pretty straight-forward.

When gluing the window box, I just glued the bottom and sides to allow me to be able to stick flowers inside the actual window box. Otherwise, glue, glue and glue some more!
TIP: I ended up cutting my window too large to use my card stock border without having to add another piece of cardboard underneath the border. If you like the look of the double border, then by all means use my accident as your inspiration!
Attach Your Retro Cardboard Play Camper to Your Table
To attach your retro cardboard play camper to your folding table, cut a small hole on one side of in a small piece of cardboard and hot glue the other side to the back of the camper then thread some twine or ribbon through the hole and around your table legs. Like So:

This will give your camper some give for rowdy kiddos and give you the ability to put away your camper and reuse it later. I intend to hang Lucas’ in the playroom.

Cover your table with a sheet & enjoy hours of fun for the kiddos!
Playing With Our New Camper


- Lucas sporting his ONE first birthday shirt.
We had sooo much fun playing today! We hid inside the camper and played with stuffed animals. Lucas carried the flowers around and looked through the door and window. Lucas’ favorite part was when the wolf pup knocked at the front door and tried to make his way in the door. He literally giggled and it was adorable.
TIP: Within about 5 minutes of letting Lucas loose with the camper, he had the paper flowers pulled out of the window box and crumpled. The flowers were super interesting to him. Knowing this now, I will probably grab some fake dollar store flowers to stick in there for playtime.
All-in-all this painted piece of cardboard is pretty sturdy & totally worth the work! I hope this post inspires you in constructing your own play camper for your own little happy camper. : )
Lindsey
Like this idea? Pin it for later!
If you’re interested in hosting a ONE Happy Camper themed party for your little one, head on over to my Etsy shop, Lukie Lou Paper Co., for some ONE Happy Camper themed invitations and more!


You May Also Like

Easter Banner Printable and FREE Cricut Template

You’ve Got Me Hooked Cricut Card Template
